Brakes: Disc [Cable and Hydraulic]
It is important that you understand the differences in bicycle brake fluid. Always use the right type for the brake and never mix fluids. DOT fluid systems should be flushed (bled) yearly. Mineral oil systems every 3-5 years.
Read this article on DOT fluid. There is much confusion!
All disc brake pads must be replaced when the overall thickness (pad material and backing plate) measures less than 2.5-3mm. Check with the manufactuer! Avid lists 3mm, Magura lists 2.5mm, Shimano measures pad material only with .5mm being the minimum.
Disc rotors must be replaced when the middle of the pad track measures 1.5mm or less (Hayes 1.52mm).
Some disc rotors have a thicker minimum so always check with the manufactuer.
It is very DANGEROUS to run brakes with thin rotors!
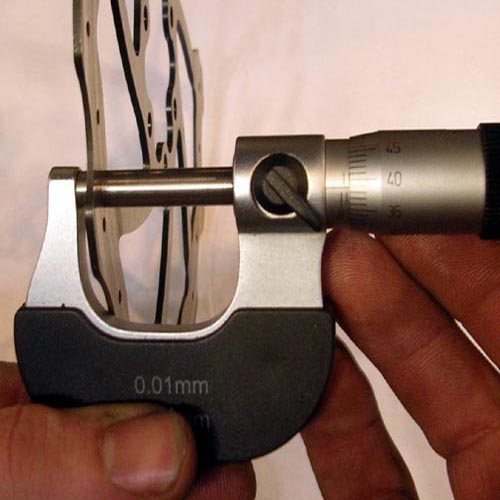
Disc rotors cannot normally be measured with a vernier caliper. A micrometer must usually be used because disc brake tracks wear in a concave shape.
However, some wavey rotors can sucessfully be measured with vernier calipers.
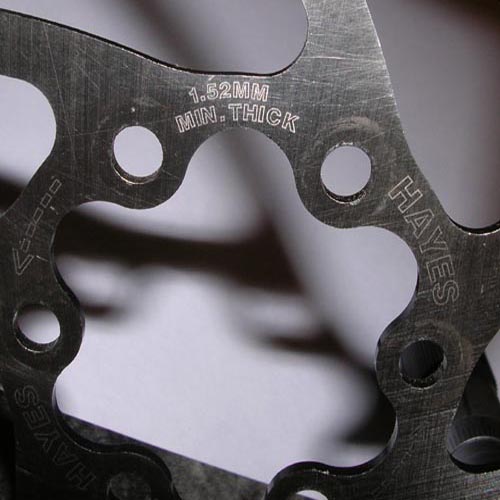
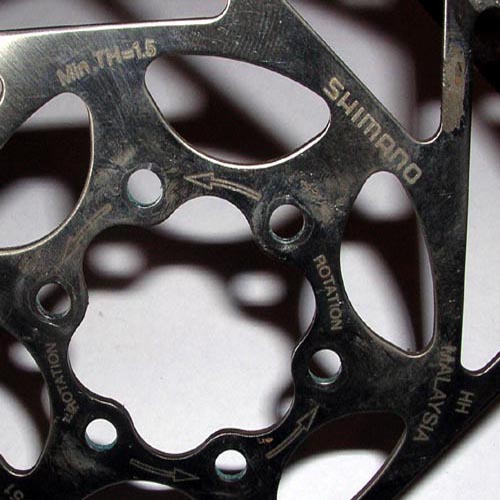
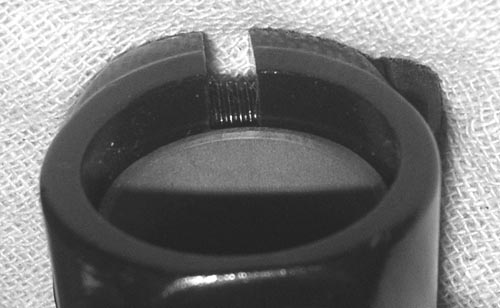
Most disc rotors now come stamped with a minimum thickness. Older discs often do not but the minimum still applies!
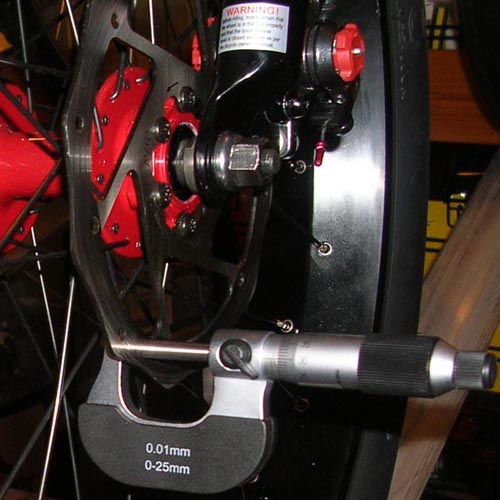
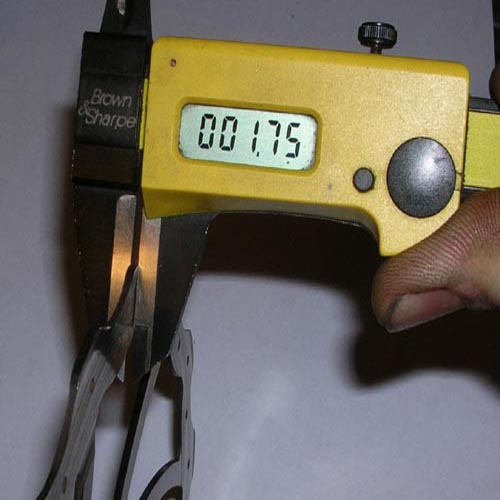
This rotor on the left measures new at 1.8mm. Nominal size is ususally listed as 2.0mm, but few actually measure that.
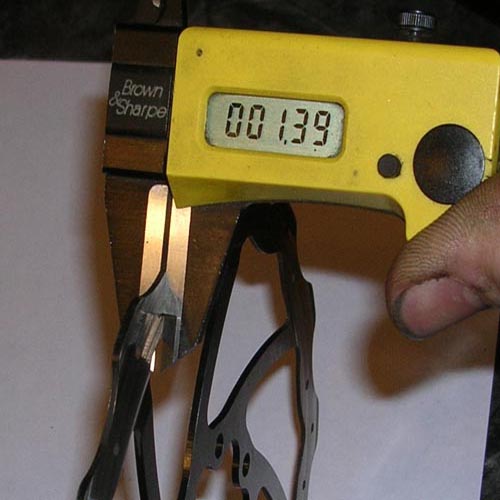
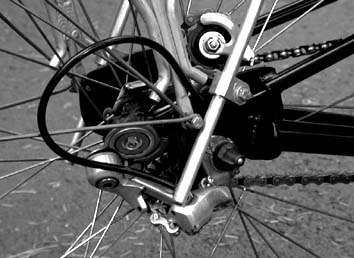
The rotor on the right (and in the two below pictures) measures 1.39mm, well below the minimum safe thickness!
Note that unless a rotor has a wavy design it is impossible to get an accurate measurement by measuring across the outer edge.
A special rule exists for Rohloff rotors f(rom an email with Stewart Stabik, OE Technical Support, Rohloff AG, Germany):
0.3mm wear is the maximum wear permitted for Rohloff discs.
Brakes: Coaster
Always use a Nylock nut on coaster brake arm straps. 6mm bolts are recommended for adult riders. Drill out strap hole if necessary.
A front hand brake is STRONGLY recommended for adults using coaster brake bikes in hilly terrain (like Seattle!)
Brakes: Center Pull Cantilever
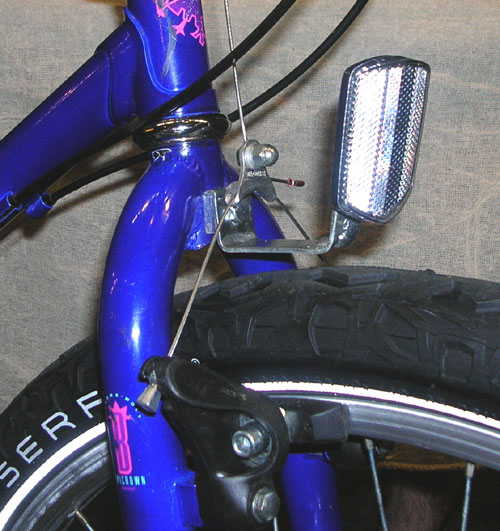
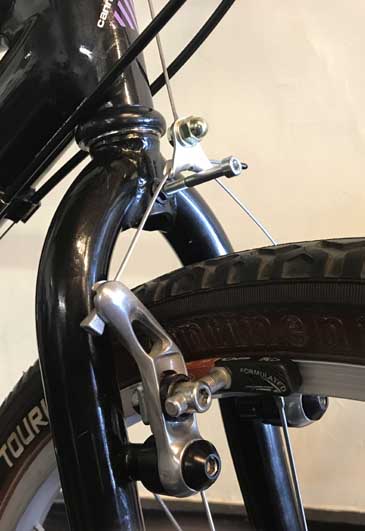
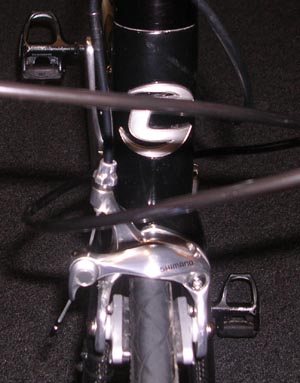
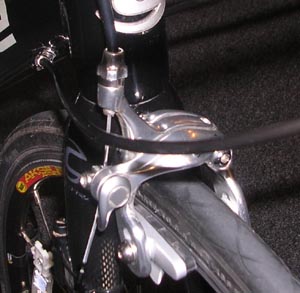
Front brakes must have some sort of straddle cable fail-safe device. If the main cable breaks then the straddle cable can get caught on the tire causing the bike to stop instantly! Knobby tires are more of a hazzard, but good practice dictates a catch be installed even on bikes with street tires because someone could change the tire. A safety catch is normally accomplished by installation of a front reflector bracket at the fork crown. A front fender also does the job. If neither is present, it is possible to make a safety-bolt out of a long M5 or M6 bolt and 2 nuts sandwiched between the front of the fork crown. If no safety catch is possible, an alternative is a piano wire or daisy chain of zip ties to the handlebar.
Brakes: Linear Pull Cantilever (a.k.a. V-Brakes)
Minimum 45mm distance between noodle seat and cable anchor bolt for new brake pad set-up.
Brake levers must be of linear pull design. Short Pull levers MUST be replaced!
It is stronly recommended that noodles with springs be replaced with rigid type.
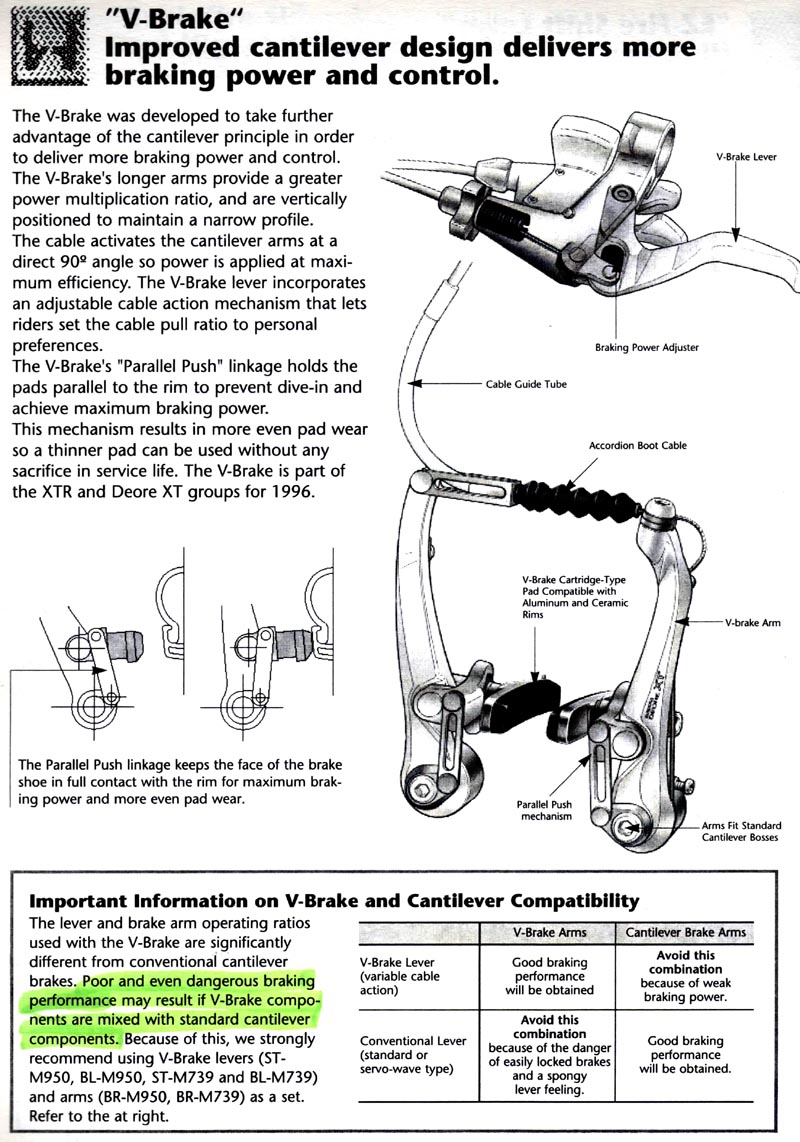
Here is a scan of Shimiano's Official V-brake design and use page including a warning and a compatibility chart.
Cargo bikes with rim brakes must have Kool Stop salmon pads.
Brake Levers: Mountian Type
Default postition: -30 to -45 from horizontal
On city type handlebars, make sure the brake lever is in-line with the riders arm and fingers. Do not angle them outward!
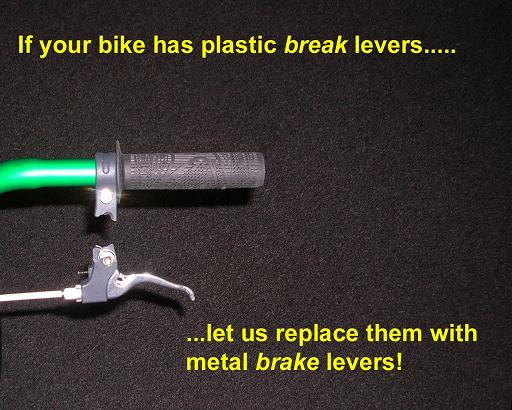
All plastic brake levers must be replaced with metal ones! Plastic levers do not stay put and are prone to breaking!
Brake Levers: Road Drop Bar Type
The tip of the lever just touches a line extended from the bottom of the drop.
When using with cantilevers, set yoke 1 cm higher than 90 degrees.
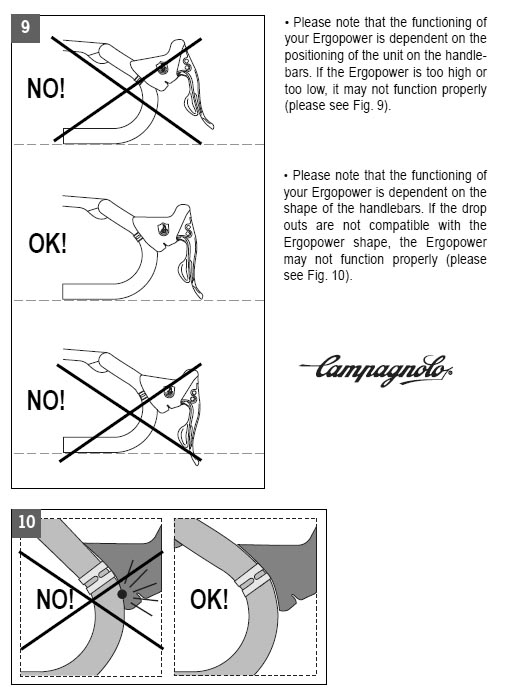
Campagnolo Ergopower "brifters"
have a very narrow installation range on the handlebar. Follow instructions!
Cables: General
Always us metal ferrules (housing caps) and slick (die drawn) stainless steel cables.
Trim ends clean and make sure no burrs point inward. Grinding or filing the housing end is NOT necessary with metal ferrules.
Cables: Brake
If possible run the rear brake housing around the left side of the headtube , even if the cable stop is on the right side of the bike. Sometimes it still will not work though, so then run it on the right side. Always check for cable housing "pull-out"
by turning the handlebars as far as they will rotate left and right. Cut housing as short as will allow full rotation of the bars.
Routing cable housing in the above manner prevents the housing from touching the frame. Vibrations and dirt can cause the housing to wear into the frame (especially aluminum and carbon frames).
Grease the head of tight fitting cable heads so that corrosion is not a problem and they can be removed in the future. Most MTB cable heads do not need grease.
Verify that a ferrule (housing end cap) is needed or NOT needed inside the brake lever. Many modern brake levers do NOT need a ferrule! Use of a ferrule in many Shimano brake levers results in the cable rubbing on the ferrule resulting in rough cable movement.
Cables: Gear
Cross the cables on downtube routing when ever possible.
Usually not possible if the cable stops are on the side of the downtube. Don't do it if the bare cables run against the frame.
For top tube cable routing, run each shifter's housing to the opposite cable stop, then run the bare cable parallel, and cross the housing by the seat cluster over to the correct cable stop.
Grease is not recommended for index cables. A dry lube like Dri-Slide is preferred.

Whatever you do, make sure that the housing is not "statically"
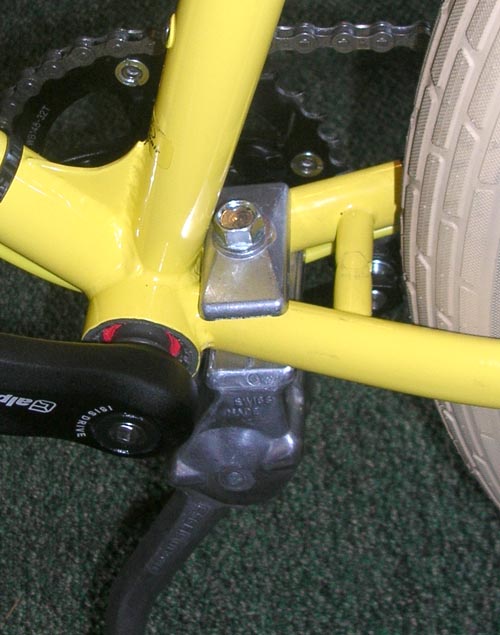
rubbing on the frame when the bike is being ridden straight. Dirt and vibrations can actually wear THROUGH carbon fiber frames! In the case above, the front gear housing should have been routed on the outside of the front brake cable. That would have prevented the frame wear.
The cables are crossed underneath the downtube. The yellow arrow shows the frame wear and the blue arrow shows the housing worn through to the wire strands. This Cannondale Synapse Carbon Fiber bike has only 2000 miles on it!
Preventing frame wear, especially on carbon fiber frames, is what is important!
Grease the head of tight fitting cable heads so that corrosion is not a problem and they can be removed in the future.
Chain
As a general rule, do not replace chains without the cassette.
Modern cassette teeth are very short and cannot accept a new chain when even slightly worn. Exceptions include, older high quality or tall teeth (old style cogs) and most older freewheels.
Test new chain first and always include room in estimate for new cogs and chainrings! 1/16" stretch over 12 inches is the MAXIMUM for chain only replacement. (older tall toothed cogs may allow up to 1/8" stretch.


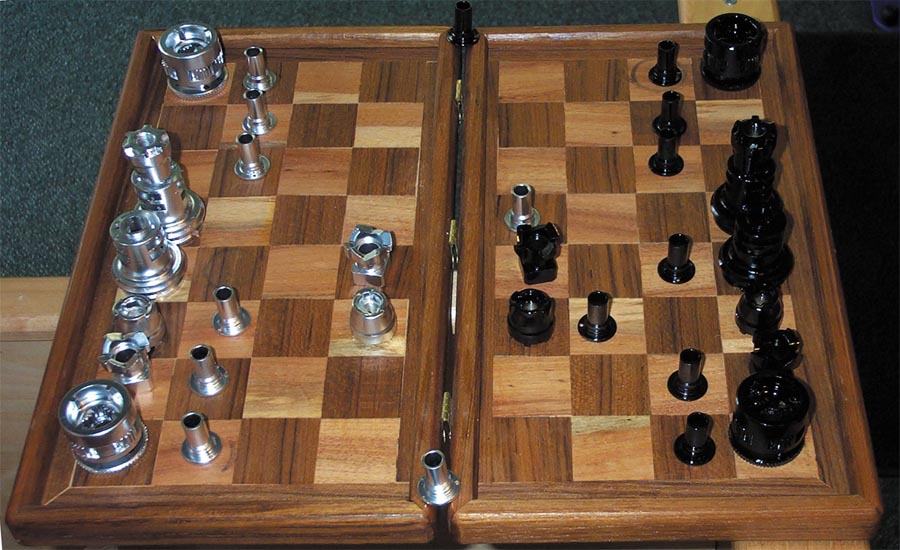
The cog on the left is an older SunTour Winner cog. It measures 1.86mm thick.
The one on the right is a SRAM Open Glide 10 speed cog. It measures 1.53mm thick.
Also note how the SRAM cog teeth are shorter than the SunTour. The height and thickness of the cog is what gives it durability. Modern cogs are NOT durable.
A modern chain should be replaced as soon as any dicernable "stretch"
is noticed. For 10 speed drivetrains replace the chain between 1/128th and 1/64th of elongation, any longer and a new cassette will most likely be needed. Usually if you notice mushrooming of the cog teeth, then it is too late.
Chain/Cog Wear Description by John Forester
Chain/Cog Wear Description bySheldon Brown
Chain/Cog Wear Descriptionby Pardo
Chain Tensioners
Simple Chain bikes (example: Single Speed, Internal Gear) with vertical dropouts must have a chain tensioner installed because of the possibility of the chain falling off as the chain wears. Fixed Gear and Coaster Brake hubs are not recommend with vertical dropouts.
Crank & Bottom Bracket
No grease or oil on square BB spindle. It is a dry press fit! Except splined type, then use grease.
Grips
To better lock-on grips, clear spray lacquer. Put a nickel in each BMX or kid's bike grip to save the ends.
Headset
Replace any BB style lockring with spacers.
Use blue marine grease and loose balls in lower stack.
Cartridge bearing (e.g. Chris King) type REQUIRE head tube, fork crown and stem facing.
Handlebars: Cruiser/City Type
Default postition: Point towards the chainstay bridge
Handlebars: Mountain Type
Default postition: Oriented flat (swept back, not up or down)
Handlebars: Road Drop Type
Default postition: Point drop at the rear brake bridge
Hubs
It is recommended that grease be added to the bearins during a hub adjustment.
Pedals & Shoes
Cleat should not be installed on shoes without a R.A.D. adjustment.
Exceptions include 10 degree or more float systems such as: Time, Bebop, Eggbeaters, Speedplay, etc.
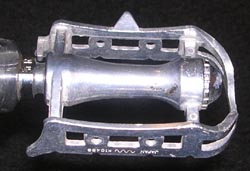
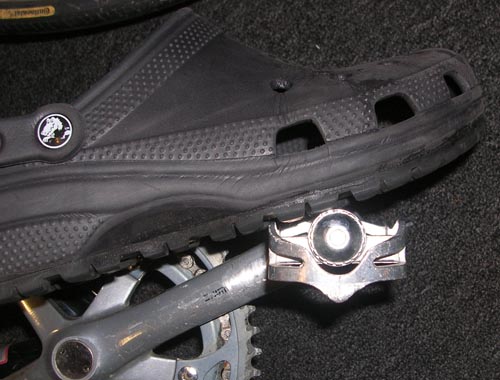
Quill type pedals should NEVER be used without toe-clips installed. They are extremely slippery when wet, especially on the flip side.
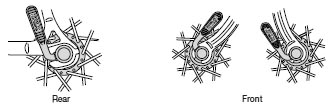
Quick Releases
Default postion: Criterium style
Front Hub: Parallel to the fork or straight back, horizontal
Rear Hub: pointed between the seat and chain stays
Seat Post: pointed back bisecting the angle between the seat stays and seat post
Levers should NEVER touch the frame.
Rims
Double wall rims must have a proper rim strip, or better, rim tape. Rubber rim strips are not compatible with double wall rims.
Seats
Default position: Installed level and moved 1 to 2 cm aft for better comfort.
Seatpost
Mark customers position when removing!
Gease all metal seatposts in metal frames. If either or both the frame and seatpost are carbon, then use carbon prep.
Frame should be checked for burrs and all edges should be filed 45 degrees or rounded, including the slot.
Carbon posts should be cut down for the customer's height so that a long section is not installed deep in the frame. Make sure at least 3 cm of post extends below the bottom of the top tube.
Carbon must be installed with friction paste.
Carbon seatposts are NOT compatible with steel frames with integrated seatpost collars (most older road frames).
Shifters: Gripshift
Orient cable pipe vertically. This gives better acess to the barrel adjuster.
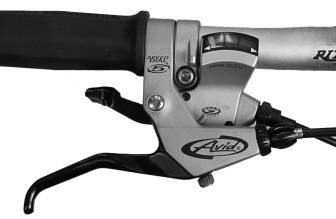
Shifters: Mountian Type
Comfortably match brake lever position and angle for good ergonomics (see pictures below. Shifter and brake lever angle will vary depending on the handlebar style and angle.
Position Shimano Rapid Fire Plus trigger shifters in from the lever so the inside trigger doesnt crowd the grip. The right picture, below, is correct.

Shifters: Road Brake/Shifters (a.k.a. Brifters)
Older Shimano grease often hardens up and makes it seem like the shifter is broken. Degreasing and re-lubing will often fix the shifter. This also applies to many Shimano mountain bike shifters. Great care must be taken when disassembling shifters as they are not designed to be serviceable. We have found that they often can be take appart to a point. This allows access to the stuck pawls.
Campagnolo Ergopower levers have very specific mounting instructions. Failure to follow them can result in the lever detaching from the handlebar!
Shifters: Internally Geared Hubs
Full length housing is recommended on hubs with a built in cable stop on the shifter mechanism at the hub (example: Rohloff, Shimano Alfine, SRAM Spectro 7). Hubs that use an indicator chain do not need full length housing.
Stem
Set at the max height line unless otherwise noted. Always mark customers position when removing!
Max line or hash marks must not be visible! If no minimum insertion mark is visible, then insert wedge type expander stems 65mm from the bottom of the quill.
As a general rule carbon steer tubes must have at least 8-10mm of steer tube sticking above the stem.For cone type expander, make sure the it expands below the steer tube threads. Depending on the brand, the maximum allowable spacer stack below the stem and above the headset is 40-50mm.
Threadless stems must have the steer tube inserted at least as far as the center of the top pinch bolt.
Tires
Position valve stem at pressure rating when installing new tire. Note tread direction on knobbies. Road tires are NOT directional, no matter what the tire says!
Tubes
Always use the fattest tube that the tire can handle.
Using a small tube can cause the tube to rupture next to the valve core.
A patched tube, done with a standard vulcanizing patch kit, is as good as new and saves resources!
Schrader valve tubes are more durable than presta. Most rims can be safely drilled to fit schrader valves. Drill size is 21/64"
Always use a grommet or Wheels MFG Stem Saver when using presta valves in rims drilled for schrader
Wheel Building
The only brand of nipples we will use are DT. Alloy are to be used for race wheels only.
If a wheel is laced with the wrong length spokes, then the spokes are not to be reused!
All wheels will be built 3 cross, with linseed oil and with the pulling spokes heads in (outbound).
We will build a wheel other than 3 cross (e.g. Radial), but no warranty is given.
We will not build a wheel with: carbon spokes, spline drive nipples, or any other unproven technology.
Stick a Phil and ABR sticker on each rim by the rim decal
When selling a stock wheel, add grease to bearings and true, tension & stress relieve wheel.
Line up valve hole with the label on the hub and orient the rim so it can be read from the right side of the bike.
GENERAL REPAIRS
See also, the Tune-Up checklist
Bicycle Assembly upgrades over stock
Add Grease to all bearings.
Pedals need no special service (do not add oil!).
Headsets: Lower stack gets loose balls, even on so-called cartridge style.
Correct any short/long cable housing lengths (cut to ideal or replace with longer).
Mechanics Daily Responsibilities
Call any customers that have missed their appointment that day, first thing!
Put away small parts collected from the days work.
Clear and clean workbench tops at days end.
Make notes as to what has been done on any repair left in stand and neatly organize work order and parts.
Sweep or vacuum repair area.
Clean and maintain tools.
Aluminum and Titanium Bolts
Replace all titanium or aluminum bolts with steel, unless specifically requested by customer. We cannot guarantee work done on non-steel bolts. Examples include crank and stem bolts.
Spoke Protectors
Any bike we do a Tune-Up, Overhaul or major drivetrain work, a spoke protector (a.k.a. Frisbee) should be installed. If the customer refuses, then explain the dangers of not using one and note the repair ticket. Keep in mind that the CPSC requires them. One problem is that often replacement spoke protectors are not available. In this case, note the work order that one is not available.
Single Speed / Fixed Gear & BMX Bikes
Bikes with a fixed cog without a track (left-handed thread only) lockring must have two functional brakes. Freewheel hub conversions with a BB lockring are NOT exempt from this rule. BMX bikes designed by the manufacturer with just a rear brake are the only exceptions.
On BMX bikes put a zip tie around frame and housing at the split stops on the frame. This keeps the housing from pulling out of the stop when the bars are turned more than 180 degrees.
Front Reflector Bracket
Any bike we do a Tune-Up, Overhaul or any major brake work to and that has cantilever brakes, a fork mounted reflector bracket or "Safety Bolt" installed must be installed. The only exceptions are if fenders are installed or the fork will not accept one. In that case note danger on repair ticket. Smooth street tires are NOT and exception because knobbies could be installed causing the dangerous straddle cable lock-up the fail safe device is designed to prevent.
INSERT PICTURE HERE
Service Stickers
Install an ABR yellow sticker at front base of seat tube as low as possible (do not cover other stickers) and a RideYourBike.com chain slap guard on the right chainstay. This helps us identify bikes we have done major service on. They are similar to oil change stickers automotive shops use.
ACCESSORIES
Bar Ends
Angled up no more than 45 and down no more than horizontal.
Cyclometer
Sensor goes on the right fork leg. If there is a lot of extra wire, coil most of it around the bar not the brake housing. Never wrap more than 4 turns around a bare cable.
Fenders
Use blue loc-tite and fender washers.
Add mud flap to front fender if missing.
Frame Eyelets Order
Racks go on the top (forward) one, Fenders go on the back (lower) one. Always use front fender stay safety releases unless the stays are mounted higher on the fork (e.g. low rider rack bosses)
Kickstand
Cut the Greenfield kickstand off at 1 cm shorter than the bottom bracket height (center of BB to ground).
ESGE Centerstands are not compatible with non-parallel chainstays where they join the BB. If installing on a bike with angled out chainstays, then replace the top plate with a flat version like Greenfield. The stock beveled top plate will not hold tight on most bikes. The kickstand will come loose and damage the chainstays.
Rear Rack
The top must be horizontal! Use blue loc-tite and 4mm allen head bolts.
Toe Clips
Installed all the way out on the pedal
Toe Straps
Run on the inside of the cage tab and twisted once
Reflectors & Lights
Perpendicular to the ground and 90 degrees to the bike and clean!
Reflectors that are below the tire, must be moved up above the tire so they do not get caught in the spokes.
Under no circumstances should a customer's reflectors be removed! The CPSC requires the front, rear, pedals and both wheels of the bike have approved reflectors.
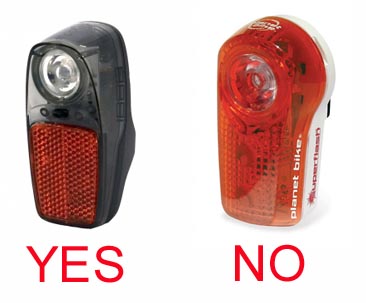
The only exception is a rear tail light that has a built-in approved reflector.
The light on the left is OK, the example on the right is not.